library(shiny)
library(bslib)

ui <- page_fluid(

)

server <- function(input, output, session) {

}

shinyApp(ui, server)Creating and publishing web-apps
Learn about frameworks and tools to create and publish web applications
It is now possible to write an application and publish it online for all to see in less than an hour.
In this session, you will learn about:
- What are some common development frameworks that can be used with R, Python, HTML and JavaScript to create data-focused web applications (“web apps”)
- How can these apps be published and shared online
- Things to consider when writing code and choosing where to publish
Some knowledge about programming can be useful but is not essential to attend this session.
First, let’s have a look at writing web apps based on the R and Python languages. They will use the Shiny and Streamlit frameworks respectively, and both can be written using the Positron IDE and published with Posit Connect Cloud.
R and Shiny
R is programming language for statistics and data science.
Shiny is a framework for data-centric web applications, originally developped for R. It can now also be used with Python.
Even though publishing systems like Quarto can offer some interaction for the viewer, they are not designed to handle complex operations in the background. Frameworks like Shiny allow you to go further by defining what operations happen on the server, and choosing from a variety of user interface (UI) elements to create dashboards and applications of any level of complexity. You get to decide which events from the UI trigger which operations on the server.
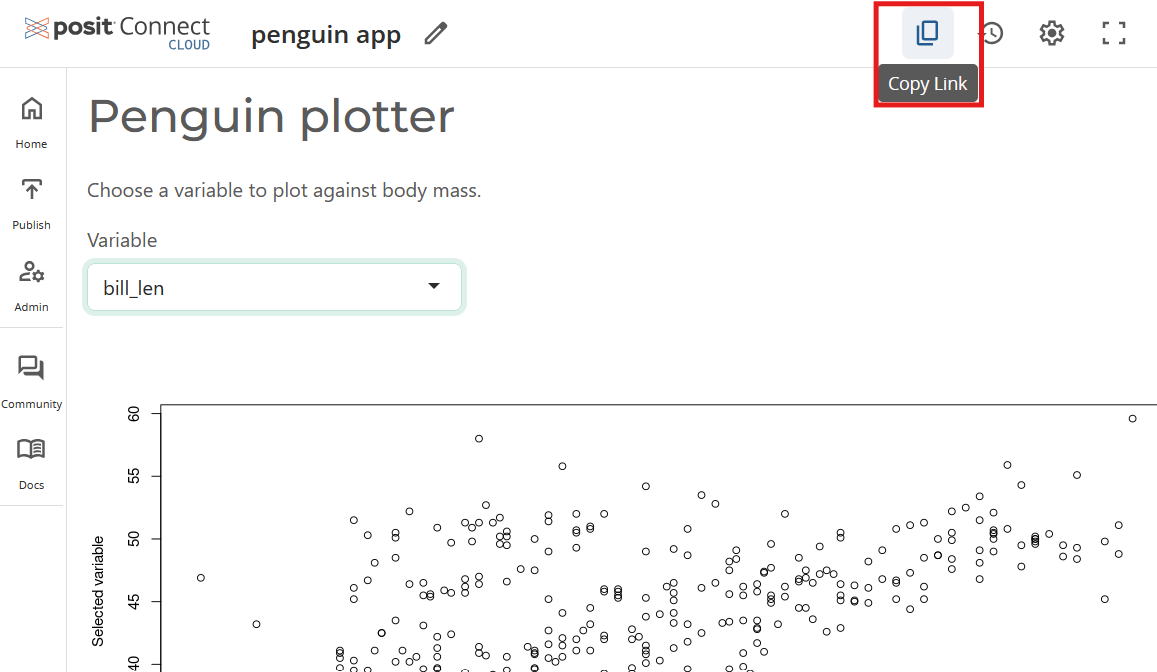
Example R + Shiny web app
Using R and the Positron IDE, you can create a small web-app from a template and publish it online.
NoteSetup
To follow the steps in this section, you need to:
- Install R (free, open source, cross-platform)
- Install Positron (free, open source, cross-platform)
- If you want to publish the app, you can create a free account on Posit Cloud
In Positron, create a new R project:
- In the top menu: “File - New Folder from Template…”
- Select “R Project” and click “Next”
- Name you project in “Folder Name”, choose where it will be saved in “Location”, tick “Initialize Git repository” if you want to use it, click “Next”
- Click “Create”
Now let’s create our first app:
- Save the script as “app.R”
- Type “shinyapp” in the script and press Enter. This inserts a code snippet that is a template for a Shiny app.
We now can see the general structure of a Shiny app:
- Some necessary R packages are loaded with
library() - The UI is defined in the
uiobject - What operations happen in the background are defined in the
serverobject - Everything is put together with
shinyApp()
The “Run Shiny app” button above the script allows you to see it in action - although it is currently just a blank page.
Let’s do a few changes to add a title, some text, a visualisation, and a control, so we can visualise data from the Palmer Penguins dataset.
library(shiny)
library(bslib)

1ui <- page_fillable(
2  theme = bs_theme(bootswatch = "minty"),
3  h1("Penguin plotter"),
  p("Choose a variable to plot against body mass."),
4  selectInput("variable", "Variable", c("bill_len", "flipper_len")),
5  plotOutput("penguin_plot")
)

server <- function(input, output, session) {
6  output$penguin_plot <- renderPlot(
    plot(penguins[["body_mass"]], penguins[[input$variable]],
         xlab = "Body mass",
         ylab = "Selected variable")
  )
}

shinyApp(ui, server)- 1
-
Use
page_fillable()to have better margins - 2
- Apply a theme from Bootswatch
- 3
- Add a main title and a description
- 4
- A control for the user: pick a variable name from a list
- 5
- Where the plot is shown in the UI
- 6
- Server-side, this is what generates the plot. Note that it makes use of the variable selected by the user (which means it re-runs every time the user changes the value).
TipShinyLive
ShinyLive is a service for writing and running Shiny apps directly in the browser. You don’t need an account, and it’s a great way to experiment and learn about Shiny without installing anything. You can even share a direct link to your app, with or without the editor on the side.
ShinyLive is available for both R and Python code.
You can start from a range of examples in the left sidebar. For example:
- Go to ShinyLive for R
- Using the default “Hello Shiny!” example, try modifying it:
- Change the histogram bar colour to “pink”
- Add this argument to switch from frequency to density:
freq = FALSE - Add a density line on top with this extra line of code under the
hist()function:lines(density(x)) - In the UI, Insert an introductory paragraph above the slider with this extra line:
p("Distribution of the waiting times between the Old Faithful geyser's eruptions."),
You should end up with this code, which you can also save directly from ShinyLive:
Show the code
library(shiny)
library(bslib)

# Define UI for app that draws a histogram ----
ui <- page_sidebar(

  # App title ----
  title = "Hello Shiny!",

  # Sidebar panel for inputs ----
  sidebar = sidebar(
    p("Distribution of the waiting times between the Old Faithful geyser's eruptions."),
    # Input: Slider for the number of bins ----
    sliderInput(
      inputId = "bins",
      label = "Number of bins:",
      min = 1,
      max = 50,
      value = 30
    )
  ),

  # Output: Histogram ----
  plotOutput(outputId = "distPlot")
)

# Define server logic required to draw a histogram ----
server <- function(input, output) {

  # Histogram of the Old Faithful Geyser Data ----
  # with requested number of bins
  # This expression that generates a histogram is wrapped in a call
  # to renderPlot to indicate that:
  #
  # 1. It is "reactive" and therefore should be automatically
  #    re-executed when inputs (input$bins) change
  # 2. Its output type is a plot
  output$distPlot <- renderPlot({
    x <- faithful$waiting
    bins <- seq(min(x), max(x), length.out = input$bins + 1)

    hist(
      x,
      breaks = bins,
      col = "pink",
      border = "white",
      xlab = "Waiting time to next eruption (in mins)",
      main = "Histogram of waiting times",
      freq = FALSE
    )
    lines(density(x))
  })
}

# Create Shiny app ----
shinyApp(ui = ui, server = server)Publish to Posit Cloud
In Positron, you can use the integrated Posit Publisher feature to publish the app to Posit Connect Cloud.
- With the app.R script opened, click on the “Deploy with Posit Publisher” button at the top-right of the Editor.
- Give a name to the app under “Create a New Deployment” at the top of the window.
- Choose your Posit Connect Cloud account (or create one).
- You are then moved to the Posit Publisher tab, in which you can click on “Deploy Your Project”.
- The “Publisher” console runs through some steps and gives you a URL when successful. You can also click on “View” in the “Deployment was succesful” notification pop up.
- From there, you should be able to copy and share a link to your app with others, like this one.
What next?
- Learn more about R and Shiny with this Get Started tutorial
- Get inspired by this Shiny gallery
Python and Streamlit
Similarly to what we did with R and Shiny, you can create a Streamlit web app using Python code, and publish it on Posit Connect Cloud, all in Positron.
Example Python + Streamlit web app
NoteSetup
To follow the steps in this section, you need to:
- Install Python (free, open source, cross-platform)
- Install Positron if not done already (free, open source, cross-platform)
- If you want to publish the app, you can create a free account on Posit Cloud
In Positron, create a new Python project:
- In the top menu: “File - New Folder from Template…”
- Select “Python Project” and click “Next”
- Name you project in “Folder Name”, choose where it will be saved in “Location”, tick “Initialize Git repository” if you want to use it, click “Next”
- Keep the option “Create a new environment” to have a separate Python environment for this project. This prevents interfering with your system’s Python installation.
- Click “Create”
Now let’s create our first app:
- Save the script as “app.py”
- Write the code below, save and press the “Run Streamlit App in Terminal” button above your script.
import streamlit as st
st.markdown("""
# Streamlit app

My first Streamlit app using **Python**!

## A line graph
""")

st.line_chart([1,2,3,2])

st.markdown("""
It's _interactive_ too!
""")
In this first app:
- We load the
streamlitmodule to use functions inside it (we give it the nicknamest) - The
st.markdown()parts use Markdown to format text (headings, bold font…). It uses GitHub-flavoured Markdown. - The
st.line_chart()function renders an interacive plot. We could of course create something more intersting with an actual dataset.
Publish to Posit Cloud
Just like we did with Shiny, we can deploy the app to Posit Connect Cloud. We do need one more thing though: a file that lists your app’s dependencies. For this example app, we only have one: the streamlit module.
Create a new file called “requirements.txt”
Write inside it one single line, and save it:
streamlitWith the app.py script opened, click on the “Deploy with Posit Publisher” button at the top right of the Editor
Give a name to the app under “Create a New Deployment” at the top of the window
Choose your Posit Connect Cloud account (or create one).
You are then moved to the Posit Publisher tab, in which you can click on “Deploy Your Project” (it should automatically include your requirements.txt file)
The “Publisher” console runs through some steps and gives you a URL when successful. You can also click on “View” in the “Deployment was succesful” notification pop up.
From there, you should be able to copy and share a link to your app with others, like this one.
Publish to Streamlit
Notice that there is a “Deploy” button at the top right of your app? You can also use this to deploy directly to the Streamlit website.
- Click on “Deploy” in the Streamlit app preview
- In the section “Streamlit Community Cloud”, click on “Deploy now”.
- Follow the instructions.
- You need to have your code hosted on a public GitHub repository. Thankfully, Positron integrate git and GitHub nicely, and it shouldn’t be too hard to get it done using the “Source Control” tab.
- Create a Streamlit Community Cloud account if you don’t already have one.
Follow the Streamlit documentation for more details.
What next?
- Explore the Streamlit App Gallery for inspiration. In each app, you can use the top-right buttons to see the source code (GitHub button) or directly make a copy of it (“Fork” button).
- Use the Streamlit Playground to learn from examples, modify them and share your creations.
- Use the Streamlit cheatsheet for an overview of the main features.
AI-assisted development with direct publication
There are now many generative AI tools available to create web applications based on a few prompts, and publish them online quickly.
- Some generative AI tools, like Claude, can generate an “artifact” (website, web app…) from a prompt and publish it in one click.
- Replit and Lovable also create and publish web apps from prompts, but include full suites of development tools for file management, testing, UI design and more.
As always, be very careful with the validity of what is generated by these tools. See for example this website generated by Claude:
- Prompts:
Create a JavaScipt web app that shows an interactive graph of global greenhouse gas emissions over the last century.
Please add a header all the way to the top of the page that says: “AI-generated by Claude Sonnet 4.6 as a learning example using a one-shot prompt. Do not use as an illustration of actual global greenhouse gas emissions.” Make it evident enough so it is the first thing people see.
- Settings: Claude Sonnet 4.6 model (March 2026)
- Result: published website
At first, the result is very impressive. But looking at it in more detail, one can spot some issues:
- Tooltip year does not correspond to X axis (shifted horizontally)
- Turning series on and off does not work as advertised (but it increases the height of the graph)
- The summary values at the top are not correct:
- total C02-equivalent emmissions for 2023 is not correct (seems to use only CO2)
- increase since 1920 is not correct (base on the graph, it should be closer to 500%)
- peak year is lower than the maximum shown on the graph
- it cites 5 sources but does not give more information on how it summarised or selected the values
Looking at the file, there are close to 1000 lines of HTML, CSS and (for the most part) JavaScript. Even with some experience, it is difficult to review such a file. Fixing problems can take a lot of effort and iterative prompting, and can lead to dead-ends.
Some recommendations for creating code with AI tools can be found in our course Introduction to AI-assisted coding.
Choosing where to write code and publish web apps
- Compare tools and platforms using AlternativeTo.net and other comparison websites.
- Pay attention to reputation, cost, data privacy, and features that enhance the security and accessibility of the web apps generated.